Chapter 6 - Turtle Deck
Section 2 - Building the Dorsal Fin
The dorsal fin is installed after the turtle deck is finally bonded into place. It smoothes the vertical fin into the fuselage. did you wonder why the bottom leading edge of the vertical fin is flat? this is because this is the area that interfaces to the dorsal fin.
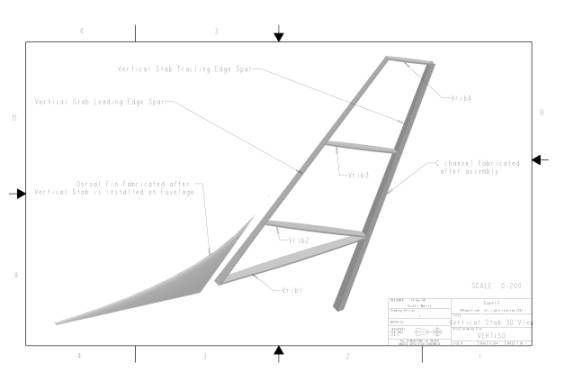
Vertical Stab Drawing Showing Dorsal Fin
The Dorsal fin is fabricated from 4 lb. 1/4" last-a-foam and 2 lb. urethane foam. First print out the following drawings:
- Dorsal Fin Sheet 1 of 3 (B sized)
- Dorsal Fin Sheet 2 of 3 (B sized)
- Dorsal Fin Sheet 3 of 3 (A sized)
The first two sheets are a full sized template for the fin itself, this will be made of 1/4" thick last-a-foam with a single layer of BID on each side for stiffness. The third sheet is a template of the ribs that will define the 3D shape of the fin. These are also made from the 1/4" foam glassed on both sides.
Next, piece together the full sized template for the dorsal fin using the three sections found on the first two sheets. Use the lines defining the location of the ribs to reference the sections to insure they are all aligned properly. Find a piece of cardboard or other stuff substraight and paste the template so we have a stiff pattern to work with. The dorsal fin here was made to fit between the vertical fin and my turtle deck. Your turtle deck may be a bit lower than mine. this is why we are using the pattern to fine tune the shape of the dorsal fin before we actually fabricate it.
Tack the pattern in place insuring you have the rear of the fin against the vertical fin so it is oriented correctly. Trim or add material to the cardboard pattern so you have a pleasing transition from the fuselage to the leading edge of the vertical fin. Once you are happy with the shape of the dorsal fin, trace the shape onto a piece of 1/4" last-a-foam with a cured single layer of BID on each side. Transfer the location of the ribs. If your dorsal fin is a little bit different shape, then adjust the psoition of the ribs accordingly. this foam sheet will become the backbone for the fin.
Using the third sheet, fabricate the ribs from a piece of 1/4" last-a-foam with a cured single layer of BID on each side.
Lay the dorsal fin backbone on a flat work surface. We will shape one side at a time so the fin can be laid upon the flat table to insure it is as flat and true as possible. Tack the ribs into position using a 5 minute epoxy and flox mixture. Now using a thick micro, bond in blocks of 2 lb. urethane foam between the ribs, and let cure.
Once the blocks of urethane foam are cured in position, and you are happy that the fin is still as straight, flat and true as possible, sand the urethane to shape using the ribs as a reference. It is best if you make sweeping movements from tip to tip of the dorsal fin, removing a small amount of foam at a time. If you use a block to slide down between the ribs, then you will end up with flat and low spots. If you are not hapy with the shape of the foam, simply trim a section out and bond in a new piece of foam and reshape. Just remember that we do not want any micro exposed at the outside of the foam, because it is significantly harder to sand than the foam and we will not get a smooth shape.
Once happy with the shape of one side of the dorsal fin, flip it over and do the same on the other side. Be especially careful with the side you just finished so it is not flattened on your work table.
When you are happy with the shape of the fin, slurry and cover with a single layer of BID. Let cure.
Using a laser level sighting down from the front of the aircraft, painting the vertical line on the firewall and the forward edge of the vertical fin, align and then bond the dorsal fin into position. Use 2.5" side strips of BID to secure it to the turtle deck and vertical fin. We will body work the joints using thick micro paste later.
Done.