Congratulations on your decision to build a Super2. The purpose of this
manual is to give you a step-by-step explanation of every construction procedure.
With any project of this size, however, questions may arise and we want to
encourage you to use the resources that are available on the Internet to
get the answers you need before proceeding. The construction of the Super2
can be a very educational and rewarding experience.
There are two very distinct approaches that builders take towards a project
such as this. The first approach is to hurry and rush the project along,
constantly anticipating the actual enjoyment of flying the airplane.
Builders who fall into this category typically start off with a big
burst of energy and progress, but get easily discouraged because they
keep looking too far ahead rather than taking it slowly and carefully
concentrating on each step at a time. The quality of workmanship in
this category will suffer unless the builder has a lot of previous
experience. There is a definite "frustration factor" which is normal
here also. We typically find that the frustrated builders are the ones who really
don't find any enjoyment in the building, but just want to hurry through the
construction so they can finally have fun in their airplane. Although finishing
the aircraft is certainly everyone's goal, and is ultimately the catalyst which
keeps the project progressing, the building of the Super2 can be just
as rewarding as flying it if the right attitude is present from the start.
The second approach (and the one which we promote) is for each builder
to have the desire to learn as much as they possibly can about
the airframe, powerplant, and all the relating systems which make up
the aircraft. If this desire is not there at the start, develop the
desire as the project progresses. The project should be something each
builder wants to do in order to develop a solid sense of confidence
in the airframe, and to develop more confidence in his or her abilities.
If craftsmanship was never a strong point, then make it a goal to attain
during the project. The important point to remember is: make the construction
phase of the Super2 project something you want to do and find some
relaxation, reward, and enjoyment in doing. In the end, you will be
an improved person for it and have a much better aircraft to enjoy.
Before beginning construction read this section and the following Fabrication
Techniques section thoroughly. Pay close attention to the safety precautions
listed in this section.
GENERAL CONSIDERATIONS
Prior to beginning any construction the following general instructions
should be considered.
- We suggest studying each individual assembly sections prior to beginning construction. This will give the builder a thorough understanding of what is to be accomplished, and will avoid any surprises.
- Make sure all the tools and materials required are on hand.
- Proceed in a stepwise manner paying close attention to the WARNINGS, CAUTIONS, AND NOTES.
- After completing each task listed int the individual assembly sections (such as fuselage or wing assembly) place a check mark in the little square box following "COMPLETED". As a result, the builder will always know where he has left off. (If you also note the date and time, this will make an excellent building log to support inspection and sign-off of your project.)
VAPORS AND DUST PARTICLES,
Avoid breathing the fiberglass particles while sanding or filing the fiberglass. Use a paper particle mask available at most hardware stores. The strong vapor smell of the resin before it cures is from the styrene in the resin as it evaporates away. Always laminate in a well-ventilated area. High concentrations of styrene in small enclosed areas may cause nausea. Avoid breathing these vapors when high concentrations exist. We recommend the use of a vapor respirator which is available at most hardware stores. We also recommend that construction be done in a garage, or area separate from living quarters, because of the vapors present.
FLAMMABILITY
The materials used in fiberglass construction are highly flammable, especially the acetone used to clean tools. Keep them away from direct sunlight, heat, sparks, and open flame. Keep track of all materials and store them in a cool, clean, well-ventilated area. Make sure all containers are sealed when not in use.
When resin gels and then exotherms, enough heat may be generated to cause
a fire. None of the lay ups on the Super2 pose a problem because they
are not thick enough. The only time this could be a problem is when a
large batch of epoxy is used in a container, coupled with high temperatures.
DO NOT throw away catalyzed resin before it has gelled,
exothermed, and cooled. If you have a pot of uncured resin left
over after a laminating procedure, let it gel on a concrete floor
before discarding.
LEAD WARNING
Lead is used for the control surface counterweights in the Super2. Lead
is a poison that can enter the body either through inhalation or ingestion.
Repeated exposures to lead over time can result in accumulation in the
body. The effects of exposure to lead include (in approximate order of
increasing severity) loss of appetite, weakness and tiredness, insomnia,
muscle and joint pain, frequent headaches, tremors, numbness, dizziness,
vomiting, poor memory, irritability, and seizures. Overexposure to lead
can damage the reproductive systems of both men and women. Birth defects,
miscarriages, or stillbirth can occur if either parent was overexposed
to lead.
Although it is unlikely that fabricating the control surface counterweights
will result in overexposure to lead, it is wise to observe the following
precautions: After handling lead, scrub your hands thoroughly before
eating, drinking, or smoking. Clean your work area thoroughly after working
with lead, carefully bagging any shavings or filings for disposal. Brush
your clothing and shoes to remove lead shavings before going into your
home from your workshop. Since lead poses a special risk to children
whose nervous systems are still developing, banish children and pregnant
women from your workshop when working with lead. Store lead in an out-of-the-way
place (preferably in a sealed and marked container) where you won't come
into routine contact with it. Keep lead out of the reach of children.
FAA LICENSING PROCEDURES
This procedure applies in the U.S.A. only. The Federal Aviation Administration
(FAA) has a definite procedure for registering and licensing homebuilt
aircraft. There is nothing complicated about it, but they insist that
you follow each step carefully.
Contact your local
FAA Engineering and
Manufacturing District Office or FAA General
Aviation District Office. Tell them you are
building a Super2 homebuilt. Give them the fol‑
lowing information:
- 3-View drawing of the Super2
- Aircraft serial number
- Aircraft registration number, if available (see step #2)
- Approximate date of starting construction
- Engine-type
FAA will then answer you, and tell you when they want to inspect your airplane, where the approved test areas are, etc.
- This step is optional, and applies only if you want to reserve a specific registration number (the number you will paint on the tail). You can ask for all numbers, numbers followed by a single letter, or numbers followed by two letters. They are preceded by the letter "N". (For example, N77Q, N8490P, etc.). Be sure to give them your second and third choice, in case the number you want is already taken. Send $10 to reserve your special number to:
FAA Aircraft Registry
Box 25082
Oklahoma City, OK. 73125
Do not register your aircraft yet, since you don't need to pay registration
fees, property taxes, etc., until your airplane is ready to fly. If you
do not desire a special number, then the FAA will assign you a random
number.
- When you are ready for inspection contact your local FAA office. Be sure you have an airframe log book (available from EAA) so that FAA can make an inspection entry.
- To prepare for your final inspection, be sure you have: The "N" number painted on, the "Experimental" sign (2" high letters) on the canopy frame, the ID plate, and an airframe log book and an engine log book.
Before final inspection, fill out an application for registration
(FAA form #AC8050-1), a notarized affidavit that you built the airplane
from parts that you bought yourself, and include $5 registration fee.
Send those things to:
FAA Registry
Box 25082
Oklahoma City, OK 73125
- After you have made a final inspection of your aircraft, run the engine, etc., but prior to any taxi tests or flights, contact your local FAA office and tell them you are ready to fly. They will have you fill out an application for airworthiness (form #8130-6), inspect your air-plane, and issue you an airworthiness certificate and a list of operating limitations. When you have completed your initial test period, contact FAA to get your operating limitations amended so you can fly outside your test area.
TOOLS
There are certain tools which are necessary to complete the aircraft.
Three lists of tools are provided here. The first is the absolute bare
minimum required, sacrificing efficiency; the second is a recommended
list for the best compromise of cost and work efficiency; the third
is a list for the "Cadillac of shops where ease of construction
is more important than money. The non-common items are stocked by Aircraft
Spruce and Specialty.
FIRST LIST - BASIC REQUIRED TOOLS
- Common household butcher knife
- Coping saw
- 1/4" drive socket set
- Small open-end wrenches
- Sandpaper
- 50 sheets, 40-grit, 3M Production Paper D-wt.
- 50 Sheets, 80-grit, 3MProductionPaper D-wt.
- 20 sheets, 240-grit, 3M Wet or Dry Silicon Carbide Waterproof.
- 20 sheets, 320-grit, 3M Wet or Dry Tri-M-Ite Pape A-wt. Silicon Carbide Waterproof.
- Small Weights - Approx. 150 lbs in 5-15 lb pieces, these can be sand bags, water bottles or weights used for weight lifting
- 6 - 6" C-Clamps
- Square and. half-round files
- Pliers
- 1" putty knife
- Hacksaw
- Blade & Phillips screwdrivers
- Box of single-edge razor blades
- 24" carpenter's level
- Carpenter's square
- Laser Level, 2 axis
- Digital Scale – measure in grams
- Calculator
- Felt marking pens
- 3-ft straightedge
- 12-ft decimal steel tape (Stanley #61-112)
- 1/4" drill with set of fraction and number bits, #30, #32, #10, 1/4" and #12 bits
- Taps; 1/4-28, 10-32, 1/8 NPT (Pipe Tap)
- Roll of grey duct tape
- Sabersaw
- Cheap holesaw set or flycutter
- Pop rivet puller
- Wall thermometer 50 to 100°F
- 6-ft straightedge
- Small set of X-Acto knives
- Dremel-type miniature high-speed hand grinder with saw and router bits
SECOND LIST - RECOMMENDED TOOLS (In addition to those in the first list
- 6" to 9" disc-type hand sander
- Set of 1/4", 1/2" and 1" chisels (wood}
- 1/2"-dia 100° counter sink (piloted)
- 6" machinist steel ruler
- X-Acto razor saw
- 3/8" variable-speed hand drill
- Hand broom/brush
- Bench-mounted belt sander
- Stanley surform plane
- Vacuum cleaner (shop type)
- Dovetail saw
- Epoxy Ratio Pump
- Plumb bob
THIRD LIST - FOR THE FIRST CLASS SHOP (In addition to those in the first and second list
- Drill press
- 18-inch bandsaw
- Vernier Caliper
- 90° drill adapter
- Air compressor with blow nozzle
- Orbital sander
- Nicopress sleeve tool
- Clecos - one dozen 1/8"
ITEMS USED ONLY OCCASIONALLY AND CAN BE BORROWED
- 1 dozen 1/8" Clecos
- 5/8" Spotface
-Lumber for a workbench and jigging
- Masonite, hardboard, plywood, etc. for jigging templates, rigging templates,
- 12" piece of 1/4" diameter wood dowell
- 6" x 6" piece of aluminum screen door screen
- Battery for electrical system
-Finishing materials: Dupont 70S dark gray laquer primer surfacer, Acrylic laquer paint'in the color of your choice
1 piece shock cord, 3-4" unstretched length
Composite Material Construction Techniques
DON'T SKIP THIS SECTION. Every hour you spend in this preparation section will save you five when you really start building your aircraft.
INTRODUCTION
In this section you won't build any part of your airplane. What
you will do is learn how to build your airplane the right way.
The construction techniques may be radically different from anything
you've done before (including building boats, surf-boards, airplanes,
and gocarts), and you should assume there is only one correct way
to do it. We've discovered many wrong ways of doing things and
have written the plans to keep you from repeating our mistakes.
We insist that you do things our way. If you have a better idea,
suggest it to us; we'll test, and if it really is a better idea
we'll publish details in the Quickie Newsletter.
This section will teach you all of the techniques required to build
your airplane, show you what special tools you need, and how to use
them. The educational samples that you will build in this section
are designed to give you experience and confidence in all of
the techniques that you will use in the construction of your airplane.
The steps in construction of each sample are arranged in sequence
(as are the steps in construction of the actual aircraft parts)
and you should follow the sequence without skipping any steps.
You will learn the basic glass layup technique used throughout
the aircraft, special corner treatments, foam shaping/cutting,
and joining methods. A summary of these techniques is provided
on yellow paper for you to tack up on your shop wall.
THE FOLLOWING TOOLS ARE ONES YOU MAKE:
Sanding Blocks
These are required in many areas during construct-ion and for finishing.
You may also use a "soft block", which is a block of the
blue-white or orange styrofoam wrapped with sandpaper.Much elbow
grease is saved if you replace the sandpaper often.
Long Straightedge This is not absolutely required, but is quite
handy when jigging or checking the straightness of flying surfaces.
It is merely a 6-ft or 8-ft 1x3 or 1x4 piece of lumber that is hand-selected
to be "eye-ball straight". You can get it one of two ways:
(1) Order it from Aircraft Spruce & Speciality Co., or Wicks
Aircraft Supply - they plane them perfect from dry lumber. (2)
Sort through the lumber (dry fir or redwood) at your local lumber
yard until you find one that looks straight when you eyeball it
from one end. Mark it and hang it on the wall so it doesn't end
up as part of a shelf!
Epoxy Balance
Devices which automatically ratio the correct amount of resin and
hardener and dispense it with the pull of a lever are available from
Aircraft Spruce & Speciality Co., and Wicks Aircraft Supply. A
digital scale and calculator work very well. A scale with
a TARE feature helps as it will subtract the weight of the cup
and then the resin for you. The calculator is used to figure
out the amount of hardner is required for the given amount of resin
poured.
MATERIALS
The materials, processes, and terminology used in the construction
of your Super2 are recent to home-building. This section is devoted
to familiarizing you with the language, materials, and techniques
used in these plans. This information is basic to the construction
of your airplane. You should study this section and be sure that
you understand all of it before continuing.
There are five basic materials that you will be working with: fiberglass
cloth, epoxy, microspheres, flox, and foam. Each material, its properties,
and uses, will be discussed in detail. Basic processes using these
materials will also be discussed.
Fiberglass Cloth
The most basic structural material in your Super2 is glass cloth.
Glass cloth is available commercially in hundreds of different weights,
weaves, strengths, and working properties. The use of glass in aircraft
structures, particularly structural sandwich composites, is a recent
development. Very few of the commercially available glass cloth types
are compatible with air-craft requirements for high strength and
light weight. Even fewer are suitable for the handlayup techniques
used in the Super2. The glass cloth used in the Super2 has been specifically
selected for the optimum combination of workability, strength,
and weight.
The glass cloth in your Super2 carries primary loads, and its correct
application is of vital importance. Even though doing your glass
work correctly is import-ant, this doesn't mean that it is difficult.
Two types of glass cloth are used, a bi-directional cloth (5277BID),
and a unidirectional cloth (5177UND). (Use the full part number for
ordering your cloth, but for simplicity the plans will use only BID
or UNI designations). BID cloth has half of the fibers woven parallel
to the selvage edge of the cloth and the other half at right angles
to the selvage, giving the cloth the same strength in both directions.
The selvage is the woven edge of a bolt of fabric as shown in the
accompanying sketch. These fiberglass cloths were developed
and proven by Burt Rutan and use his name.

UNI cloth has 95% of the glass volume woven parallel to the selvage giving exceptional strength in that direction and very little at right angles to it. BID is generally used as pieces which are cut at a 45-degree angle to the selvage and laid into contours with very little effort. BID is often applied at 45 degree orientation to obtain a desired torsional or shear stiffness. UNI is used in areas where the primary loads are in one direction, and maximum efficiency is required, such as the wing skins and spar caps. Multiple layers of glass cloth are laminated together to form the aircraft. structure. Each layer of cloth is called a ply and this term will be used through-out the plans. Marking and cutting the plies of glass cloth is a job that you will repeat often in the construction of your Super2. Glass cloth should be marked, cut, and stored in a clean area with clean hands and clean tools. Glass contaminated with dirt, grease, or epoxy should be discarded. A clean, smooth surface is needed for marking and cutting. The area used for storing and cutting glass cloth should be separated from the air-craft assembly area because otherwise it mill be. exposed to foam dust, epoxy, and other things which can contaminate the cloth. You will need a good sharp pair of scissors, a felt-tipped marker, a fairly straight board, and a tape measure for marking and cutting. The small amount of ink from marking and numbering plies has no detrimental effects on the glass cloth. In each step the size, type, and fiber orientation of each ply is given. Take the list to your glass cutting table, roll out a length of the appropriate cloth, straighten the selvage, mark all of the plies, and cut.
Now is a good time to stop reading long enough to go and cut a square ply of BID and see how easy it is to change its shape by pulling and pushing on the edges as shown in the sketches. Cut a square with the fibers running at 45° and pull on the edges to shape the piece.
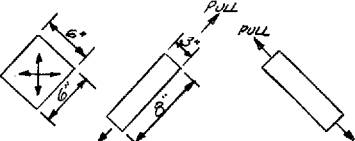
It helps if you make fairly straight cuts, but don't worry if your cut is within 2 inch of your mark. As you cut BID, it may change shape, just as the square ply that you are experimenting with does when you pull on one edge. Plies that distort when cut are easily put back into shape by pulling on an edge. Rolling or folding cut plies will help keep them clean and make it easier to maintain their shape. If several plies are called for, it may help to number them before cutting. Save your clean scraps and make an effort to use them for smaller plies. If the cloth is spotted with epoxy, throw it away.
When cutting long strips or large pieces of 45-degree BID, always roll
or fold it so it keeps its shape when handled. When it's applied,
it can be set on one end of the part and rolled onto it.
If you pick up each end, it will distort and not fit the part properly.
The fiber orientation called for in each lamination is important
and shouldn't be ignored,. UNI is characterized by the major
fiber bundles running parallel to the selvage and being much larger
than the small cross fibers which run at right angles to the selvage.
In BID the cross fibers are the same size as those running parallel
to the selvage, giving BID an even "checker-board" appearance.
BID is commonly used for plies cut at 45° to the selvage. Your
tailor would call this a "bias" cut. The 45° cut
makes it easy to work wrinkles out of a ply locally, without having
to chase it to the far edge. The 45° cut also makes it possible
to make a ply slightly longer than originally cut by pulling on
the ends, or wider by pulling the sides. The 45° orientation
isn't critical; you don't need to measure it. Your eyeball of a
rough diagonal (45° ± 10°) is adequate when either
cutting or laying up the cloth.
EPOXY
In recent years the term "epoxy" has become a household
word. Unfortunately, "epoxy" is a general term for a
vast number of specialized resin/hardener systems, the same as "aluminum" is
a general term for a whole family of specialized metal alloys.
Just as the "aluminum" pots and pans in your kitchen,
the "epoxy" in
your Super2 is vastly different from the hardware store variety.
Epoxy is the adhesive matrix that keeps the plies of load-carrying
glass cloth together. Epoxy alone is weak and heavy. It is important
to use it properly so that the full benefits of its adhesive capability
are obtained without unnecessary weight. A large portion of your
education in composite structural work will be spent learning how
to get the full strength of an epoxy/glass mixture with the minimum
weight. This section will discuss the terminology and techniques
for working with epoxy resin and its hardener.
An "epoxy system" is made up of a resin and a hardener tailored to produce a variety of physical and working properties. The mixing of resin with its hardener causes a chemical reaction called curing, which changes the two liquids into a solid. Different epoxy systems produce a wide variety of solids ranging from extremely hard to very flexible. Epoxy systems also vary greatly in their working properties; some are very thick, slow pouring liquids and others are like water. Some epoxy systems allow hours of working time and others harden almost as fast as they are mixed. A single type of resin is sometimes used with a variety of hardeners to obtain a number of different characteristics. In short, there is no universal epoxy system; each has its own specific purpose and while it may be the best for one application, it could be the worst possible in another use.
The epoxy systems used in the construction of your Super2 are tailored for a combination of workability and strength, as well as to protect the foam core from heat damage and solvent attack. These systems are very low in toxicity to minimize epoxy rash. The epoxies are not. similar to the common types normally marketed for fiberglass laminating. Two different systems are used in the Super2: a normal curing system, and a 5-minute system. The very fast curing (5-min.) system is used much like clecos are used in sheet metal construction (or clamps in woodwork); for temporary positioning. Five-minute is also used in some areas where high strength is not required, but where a fast cure will aid assembly.
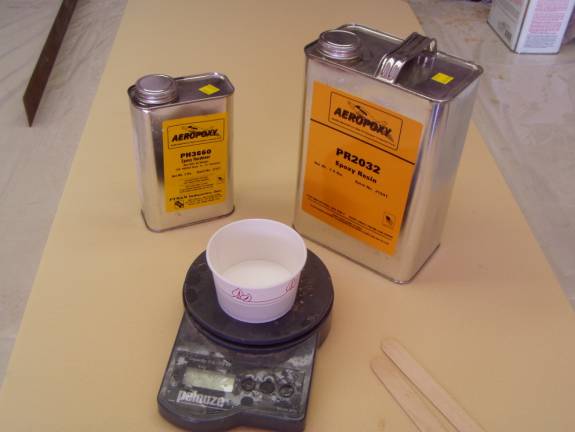
Aeropoxy PR2032 and PH3660 will cure to a firm structure at room temperature
within one day. Complete cure takes several days and the epoxy may be
heat cured for additional strength. This is done at elevated temperature
of 150 to 160 degrees F.
5 minute epoxy can be used on any foam bonding where parts are small-
and the fast cure allows the next step to be done soon. Also used as
a temporary joint for jigging.
The working and strength characteristics of an epoxy system are dependent
on the resin, the hardener, and on the amount of each in a given mixture.
Epoxy systems are engineered for a specific ratio of resin and hardener.
It is quite important that the proper mixture be obtained. An accurate
balance or ratio pump must be used to accomplish this. The mix ratio
accuracy is particularly important with Aeropoxy. The 5-Min. can be adequately
rationed by merely pouring a blob of part A in a cup and adding a blob
of part B that looks the same volume before mixing. Never eyeball
or estimate Aeropoxy, always carefully use the balance or pump.
Epoxy resin and hardener are mixed in small batches, usually 6 ounces
or less, even in the largest layup. The reason for small batches is that,
in large batches, as the hardening reaction progresses, heat is generated
which speeds the reaction, which causes even more heat, which ends up
in a fast reaction called an exotherm. An exotherm will cause the cup
of epoxy to get hot and begin to thicken rapidly. If this occurs, throw
it away and mix a new batch. The small volume batch avoids the exotherm.
For a large layup, you will mix many small batches rather than a few
large ones. With this method you can spend many hours on a large layup
using epoxy that has a working life of only a few minutes. If the epoxy
is spread thin as in a layup its curing heat will quickly dissipate and
it will remain only a few degrees above room temperature. However, in
a thick buildup or cup, the low surface area to mass ratio will cause
the epoxy to retain its heat, increasing its temperature. This results
in a faster cure causing more heat. This unstable reaction is called
an exotherm. Exotherm temperatures can easily exceed the maximum allowable
for foam (200°F) and damage the foam-to-glass bond.
Unwaxed paper cups are used for mixing and ratioing resin and hardener.
Convenient 8-oz cups for resin are provided. The hardener cups are the
3-oz unwaxed bathroom paper cups. Don't use waxed cups; the wax will
contaminate your epoxy.
Mixing is done by stirring with a stick, being careful not to spill any.
If you spill part of an unmixed cup, the ratio of resin and hardener
may be inaccurate and it shouldn't be used. Mix each cup for at least
two minutes. You should spend 80% of your mixing time stirring the
cup and 20% scraping the sides to assure complete mixing. Do not mix
with a brush. The bristles can soak up the hardener, changing the ratio.
Use a tongue depressor or wood stick.
The working temperature has a substantial effect on the pot life and
cure time. Very hot conditions will cause the cure to speed up. -In cold
working conditions the cure will be delayed and if it is cold enough,
epoxy may not cure at all. Working temperatures must be between 70° and
90°F. A range of 75 to 80°F is best. Be sure to get a wall thermometer
(approx. $1.50 at any general store) to check the temperature of your
work area. At 75°F, 5-Min must be used within four minutes, and Aeropoxy
must be used within 20 minutes.
Cold epoxy results in increased time required to do a layup, since it
takes longer to "wet" and to squeegee the cloth. A layup at
65° may take almost twice the time as at 75°F. On most layups
(except for joining foam cores) its best to have 75 to 80°F room
temperature and 80 to 90°F epoxy. Resin and hardener can be kept
warmer than room temperature by keeping it in a cabinet with a small
light bulb on. DO NOT store your resin or hardener on a cold floor if
you plan to use it within the next several hours. If you let your shop
get cold between working periods, keep some resin and hardener in the
warmest place of your house for use on the next layup.
Save your mixing cups, as they can be used as a quality check of your
epoxy. After a day or two take a sharp knife point or scribe and scratch
the surface of epoxy in the cured cup. If the epoxy cured properly, the
scribe will make a white scratch mark. If the epoxy hasn't cured,
the scribe will make a dull ridge, indicating a soft surface. If this
occurs, the epoxy has not cured, either due to inadequate time or temperature,
or bad mixing, or bad epoxy.
MICROSPHERES
Microspheres are a very light filler or thickening material used in a
mixture with epoxy. Micro, as the mixture is called, is used to fill
voids and low areas, to glue foam blocks together, and as a bond between
foams and glass skins. The glass bubble-type supplied is lighter than
most common types. Microballoons must be kept dry. If moisture is present
it will make them lumpy. Bake them at 250°F; then sift with a flour
sifter to remove lumps.
Micro is used in three consistancies; a "slurry" which is
a one-to-one by volume mix of. epoxy and micro-spheres, "wet micro" which
is about two-to-four parts microspheres by volume to one part epoxy,
and "dry micro" which is a mix of epoxy and enough microspheres
to obtain a paste which will not sag or run (about five parts-to-one
by volume). In all three, micro-spheres are added to completely mixed epoxy.
You do not have to accurately mix the micro-spheres; just dump them
in until the desired consistency is obtained. Micro slurry is used
to paint over foams before glass cloth is applied over them. Slurry is
almost the same viscosity as.the pure epoxy and is runny enough to apply
with a brush. However, the easiest way to apply slurry is to pour it
onto the surface and spread it out evenly using a squeegee. When
skinning urethane foam use a full thick coat of slurry. Inadequate
slurry on urethane can result in a poor skin bond. Wet micro is used
to join foam blocks, and, while it is much thicker than slurry, it is
still thin enough to sag and run (like thick honey). Dry micro is used
to fill low spots and voids and is mixed so that it is a dry paste that
won't sag at all. In all three micro types, you don't measure, just add
micro-spheres until the desired consistency is obtained. Use micro only
as specifically shown - never use micro between glass layers.
Always use the following method to join foam blocks. This is extremely important.
- Check that the foam blocks fit closely together. If there are voids over 1/16 inch, sand to fit, or fill the void with a sliver of foam.
- Paint a light coat of micro slurry on both surfaces. If joining foam to fiberglass, paint pure mixed epoxy (no microspheres) on the fiberglass surface and micro slurry on the foam surface.
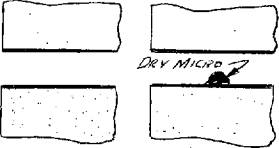
- Refer to the sketch and trowel wet or dry micro in the center of the joint. Thus when joined the micro is pushed outward expelling (rather than trapping) air. If the fit is excellent use dry micro.
- Push the two pieces together, wiggling each to move the micro toward the surfaces. Be sure the micro is no thicker than 0.1 inch at any place, to avoid exotherm. Wipe off any excess. Do not be concerned if the micro does not completely reach the surface. That void can be filled immediately before skinning the part.
FLOX
Flox is a mixture of cotton fiber (flocked cotton) and epoxy. The mixture
is used in structural joints and in areas where a very hard, durable
buildup is required. Flax is mixed much the same as dry micro,
but only about two parts flock to one part epoxy is required.
Mix in just enough flax to make the mixture stand up. If "wet
flax" is called out, mix it so it will sag or run.
When using flox to bond a metal part be sure to sand the metal dull with
220-grit sandpaper and paint pure mixed epoxy (no flax) on the metal
part.
BONDO
Throughout these plans the term "Bondo" is used
as a general term for automotive, polyester body filler. Bondo is used
for holding jig blocks in place and other temporary fastening jobs. We
use it because it hardens in a very short time and can be chipped or
sanded off without damaging the fiberglass. Bondo is usually a dull gray
color until a colored hardener is mixed with it. The color of the mixture
is used to judge how fast it will set. The more hardener you add, the
brighter the color of the mixture gets, and the faster it hardens. This
simple guide works up to a point where so much hardener is added that
the mixture never hardens. Follow the general directions on the Bondo
can for fast setting Bondo. Mixing is done on a scrap piece of cardboard
or plywood (or almost anything), using a hard squeegee or putty knife.
A blob of Bondo is scooped out of the can and dropped on the mixing
board. A small amount of hardener is squeezed out onto the blob and then
you mix to an even color. You will mix the blob for about one minute.
You will then have two to three minutes to apply ft before it hardens.
Be sure to clean the board and putty knife off before the Bondo is completely
hard. MEK will clean Bondo off your putty knife and squeegee if it isn't
completely hardened.
PEEL PLY
Peel ply is a layer of 2.7oz dacron fabric which is laid up over a fiberglass
layup while the fiber-glass is still wet, and is later removed by lifting
an edge and "peeling" it off. The most convenient form of
dacron to use is "surface tapes", normally used in covering
fabric aircraft. These are available in rolls. You will need at least
one roll, 2" wide. Peel ply is used for two purposes:
- Peel ply any area that will later be structurally attached to another fiberglass layup. Once the dacron is peeled off, the surface is ready for another layup, without sanding. If you do not use peel ply, you will have to sand the surface completely dull (no shiny spots). This sanding is hard, itchy work and ruins the strength of the outer ply of fiberglass.
Note that to peel ply the trailing edge overlap
area, the peel ply is the First ply made to the foam
core. Lay a strip of dacron down on the overlap notch
and secure it with tacks or staples so it doesn't move
when you layup the skin.
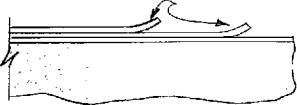
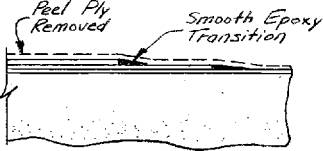
- The second use for peel ply is to transition the area where the top ply of a layup terminates on the fiberglass surface.
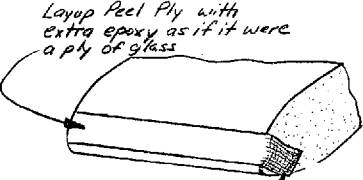
Refer to the adjacent sketches. If the top ply edge is laid up bare it results in a rough edge that can delaminate if a little dry. Sanding the rough edge is hard, itchy work and usually results in damaging the adjacent surface. If the edge is overlaid with a
 strip
of dacron during the layup (lay on the dacron and wet out by stippling
or squeegeeing) it will make the edge lay down flat and will form a wedge
of epoxy to smoothly transition the edge. After cure,.peel off the dacron.
The result is a beautifully transitioned smooth edge with no delimitation
tendency. Use this method in all places where a cloth edge terminates
on the surface.
strip
of dacron during the layup (lay on the dacron and wet out by stippling
or squeegeeing) it will make the edge lay down flat and will form a wedge
of epoxy to smoothly transition the edge. After cure,.peel off the dacron.
The result is a beautifully transitioned smooth edge with no delimitation
tendency. Use this method in all places where a cloth edge terminates
on the surface.
FOAM

Two different types of rigid, closedcell foam are used. Last-a-foam sheets in various
thickness of about 4.5 lbs per cubic foot and polyurethane
sheet of about 2 lbs per cubic foot density.

Do not substitute foams for those recommended for the Super2.  Getting
the wrong material for your airplane can result in more work and/or degraded
structural integrity.

Since sunlight can damage foam, avoid exposure of foam to the sunlight
by keeping it covered.